The answer to your question (baring in mind that the question is raised for Marlin 1.1.9) is the file ultralcd.cpp. Nowadays, you can also enable extra option through the Configuration_adv.h file, just enable:
#define CUSTOM_USER_MENUS
and edit the options beneath it to your needs (otherwise it will use the preset values from the Configuration.h file).
Add custom items using ultralcd.cpp
This is how I used to do it if you want to add items to the menu in Marlin Firmware through the ultralcd.cpp. It is best to first look at the current implementation of the menu items. As you already mention Preheat PLA, that would be the first to search for. Searching in files is easy when you go to the github website with the Marlin firmware sources, functionality is available for searching in the files. Alternatively, download a copy of the firmware and use a free "grep" utility to search in files.
Searching for Preheat PLA will show you a bunch of language translation files. These point to the use of a constant MSG_PREHEAT_1 which finds its presence in ultralcd.cpp. This hints to function lcd_preheat_m1_menu that is called by MENU_ITEM which adds menu items to LCD. You could start there to add your own option.
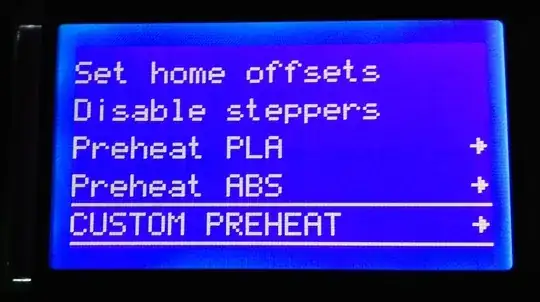
Demonstration
As a quick demonstration, I've added a CUSTOM PREHEAT item by copying the lcd_preheat_m2_menu function in ultralcd.cpp and renamed this lcd_preheat_m3_menu (a full functional item needs changes within the lcd_preheat_m3_menu as it now uses the constants from the ABS preheat option).
You then add the item to the menu by changing this part of the code:
      //
      // Preheat for Material 1 and 2
      //
      #if TEMP_SENSOR_1 != 0 || TEMP_SENSOR_2 != 0 || TEMP_SENSOR_3 != 0 || TEMP_SENSOR_4 != 0 || HAS_HEATED_BED
        MENU_ITEM(submenu, MSG_PREHEAT_1, lcd_preheat_m1_menu);
        MENU_ITEM(submenu, MSG_PREHEAT_2, lcd_preheat_m2_menu);
        // ADD THIS LINE:
        MENU_ITEM(submenu, "CUSTOM PREHEAT", lcd_preheat_m3_menu);
      #else
        MENU_ITEM(function, MSG_PREHEAT_1, lcd_preheat_m1_e0_only);
        MENU_ITEM(function, MSG_PREHEAT_2, lcd_preheat_m2_e0_only);
      #endif
After compiling and uploading to the printer board, enter the Prepare menu and scroll down to see: