7

I just finished assembling my Ender 3 Pro and am having trouble with bed leveling. The extruder doesn't even come close to the bed, the z-limit stops the nozzle about 3-4 mm away.

Extruder and bed gap

The leveling springs are already pretty uncompressed. Is there any way to decrease the gap? Should I be checking for a specific assembly step to see if I assembled it incorrectly somewhere?

Greenonline
  • 6,748
  • 8
  • 40
  • 68
Brad K
  • 73
  • 1
  • 1
  • 4

3 Answers3

5

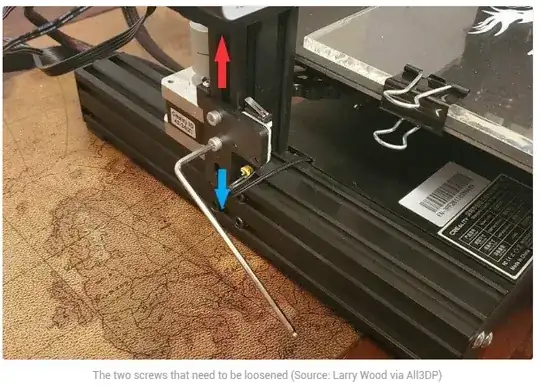
There is only one thing you can do if there are no more threads left on the levelling screws, you need to move the Z-end stop assembly (depicted in the front left of your photo) to a lower position. Just unscrew the two hex screws a little and move the assembly down (blue arrow direction in the bottom/last image below). However, the more recent Ender 3 versions have a notch on the Z-end stop bracket:

enter image description here

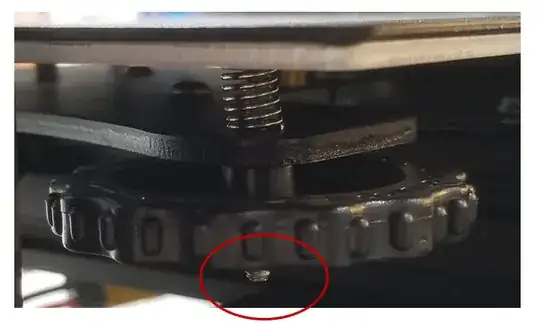
That notch rests on the frame:

enter image description here

You should not be lowering this notch lower than the aluminum frame top.

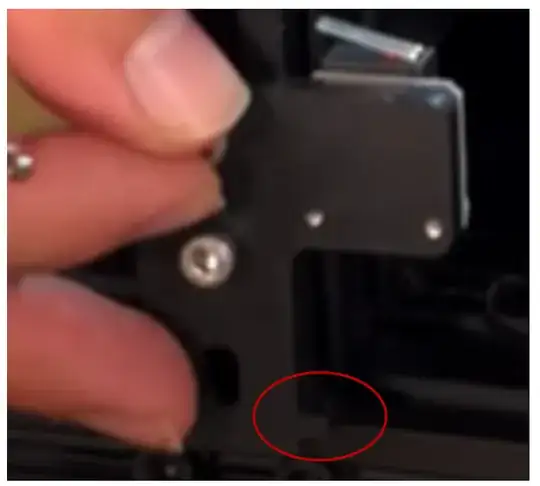
Referring to your image and enlarging it, it appears you still have some threads left (encircled in red), this may be enough to get the bed to the nozzle (note that the leveling screw contains a knurled brass M3 insert, so you should be able to unscrew a little further):

enter image description here

If not, you should first unscrew the levelling screws a little so that you can properly tram the bed (alternatively, use longer countersunk screws). A detailed description can be found at All3DP's Ender 3 (Pro) Z Offset: How to Adjust It.

enter image description here

0scar
  • 37,708
  • 12
  • 68
  • 156
2

It's normal for your nozzle to be some distance away from the bed. It should be adjusted properly at first. Since, you can't move your nozzle any lower, you should follow these steps:

  1. Lowering Z-endstop

    You can manually reduce the distance between the nozzle and the bed by moving Z-endstop. Find the Z-axis limit switch (which is located on the left Z-axis on Ender-3) and loosen its screws. Next, set the switch a little lower to minimize Z-offset.

  2. Adjusting with bed leveling knobs

    It looks like you still have some space between the bed level knob and the bed. You can lower this distance by turning the knob clockwise (looking from the top). You should turn all four knobs exactly the same amount. Do not turn the knobs more than one turn, lower the Z-endstop first. This option should be executed last to calibrate the offset as precisely as possible.

The nozzle shouldn't be touching the build plate, because it will damage the printing surface. To check if the distance is set correctly, you can print first layer test model. It may be necessary to level the bed at first.

kosteklvp
  • 1,221
  • 2
  • 8
  • 25
-1

Based on your picture, I can tell that the leveling springs aren't standing straight up, rather they are leaning at an angle, making it so that full extension doesn't push the platform up as high as would be possible if they were straight. I had the exact same problem. I simply took a pen and nudged all the springs to make them stand up straight, and it solved the problem.

I know it doesn't look like it will help much, but trust me it does.

AJ Bensman
  • 99
  • 1