I'm new to 3D printing. I modeled an empty bird in Blender (the stl file of model is presented). I tested the model in Blender (using 3D printing tool) and also the Netfabb software. They don't show any error. However, when I load this model in Ultimaker Cura for printing, as shown in the last image, the result is only a cylinder shape bird. I have seen many 3D printed empty models on internet. Why can't my model be printed correctly? the download link of the model
Asked
Active
Viewed 1,610 times


3 Answers
4
You have modeled your bird. So far so good, but you likely only modeled a single surface and not a closed surface body. The crucial step was forgotten, as your pictures 1 and 2 show: you have designed a single surface for most of the object, not a body. To turn the bird into a printable object needs it not to be a single surface but a surface enclosing a volume that has some thickness.
At the moment, it looks like this: 640 vertices, NO enclosed space.

To achieve an even thickness object in blender:
Ato choose the whole modelEfor extrude RegionZZto constrain movement to Z axis- type in the wanted thickness
- remember, that the grid in Blender is usually in cm, while slicing programs reference in mm!
- close the edges by creating faces there (chose 3 and
F)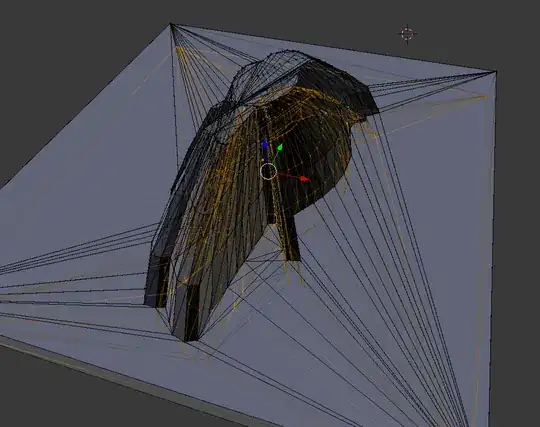
Ato grab everythingWthenRto remove doubles, increase the merging distance to 0.05 (it takes away hundreds of superfluous, slightly shifted vertices!)CTRL+Nto recalculate normals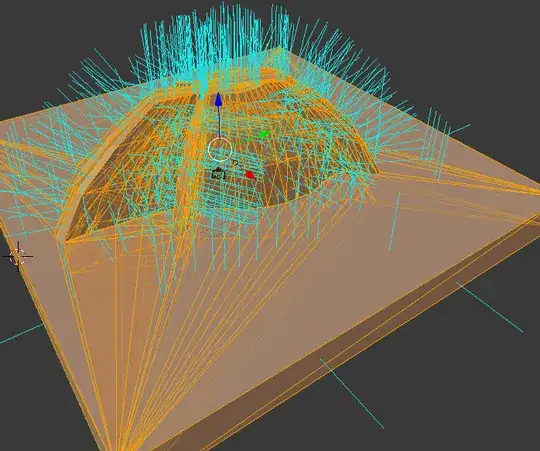 Make sure to check the slicer, because we have some strays, visible in red... where are those? They are faces hidden in the body!


Hide the underside (Select nothing, allow viewing through the object, 3 > B > draw a box around the lowest layer > H)
If you have the normals visible, you'll see the iffy areas now. Fix them by removing the superfluous faces and flipping those that are not superfuous but just inside out (W>F). One example area I highlight in the next picture

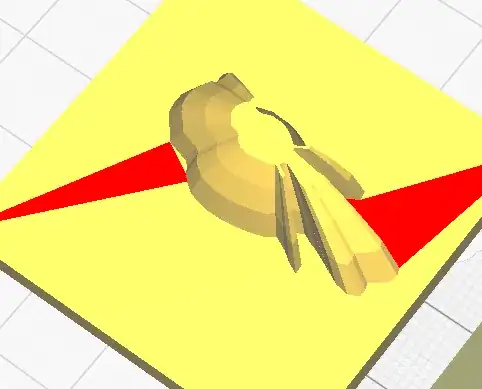
In the end, it should look like this in cura:


Make sure to check layer view and possibly thicken some areas manually - or make a box-part for the top, so you can ensure printability. As you'll see, at some scales, some walls are too thin due to how we extruded along Z only.

Alternate ways
As noted in the comments, instead of the Z-Extrude, a model with very vertical walls could benefit from using the solidify modifier. You will have to add it via object mode, modifiers and then choosing solidify and setting a positive thickness. To properly convert the visible modifier into an actual change of the model for the export, you will have to Apply the modifier.
Afterwards, go back to hunting stray internal surfaces and flipped faces.
Trish
- 22,760
- 13
- 53
- 106
3
after a lot of search, i used the autodesk Meshmixer to add thickness to the model. I used the blender only for modeling and didn't use the solidify modifier to add thickness to the model. Then in autodesk Meshmixer, using select→ edit → Extrude, i added thickness to the model (the new stl file is presented). It seems that the new model can be printed. However, the blue lines can be seen in the print preview of Ultimaker Cura and i dont know how to remove them. Unfortunately, i haven't a 3d printer to test the model, but it seems that it is printable. the link of repaired stl file


sara
- 71
- 5
1
Slicers don't do well with "empty" (hollow) bodies, or bodies with secret holes in it. You need to supply a filled body1, the slicer will make it mostly empty anyways (depending on the infill percentage). Also, you need to have infill, else the top cannot be printed as it does not have any support.
Footnote
1 This means the body has to have one continuous surface without gaps or holes that encloses a volume. Among the most simple examples are spheres and cubes.